Presentation software enables the user to add tables in the slides in order to represent the statistical data meaningfully. In this post you will learn to work with tables.
Open a new file using presentation software. You can insert a table in two ways:
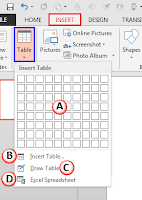
Click on Table option under Tables group in the Insert tab, a drop down appears as shown below :Open a new file using presentation software. You can insert a table in two ways:
- Using Insert tab
- Using Title and Content Option
You can have learnt to create tables in a word processor by dragging the mouse over requisite number of boxes. Follow the same method here and create the table shown below. Now go ahead and try the Insert Table… and Draw Table options to create the table.
Using Title and Content Option
Open a new file using presentation software and change the layout of the slide. To
change the layout of a slide do the following:
Click on Layout option available under Slides group in the Home tab, as you did while selecting a movie clip. Click on Title and Content option from the dropdown list. You can insert the table in the slide by clicking the
icon available within the layout. Once you click the icon, a dialog appears as shown below :
Now enter the values for the number of columns and rows that you would like to have in the table. For example, if you need a table with 3 columns and 3 rows, type 3 in both Number of columns and Number of rows fields. Once you have inserted the table into the slide, additional tabs - Design and Layout - are made available. You can use them for editing and formatting the table further.
You can change the design of the table by changing background, borders or effects by using Table Styles group in the Design tab. To use a particular design, Select a design under Table Styles group and double-click on it. If you would like to change a design, choose a different design under Table Styles group and double-click on the new design. You have learnt to create a table in a presentation, but if the table already exists in a word processor document or a spreadsheet, you can directly import it from there. To do so:
With a slide in edit mode, choose Object from the Insert menu.
- In the Insert Object dialog box, click the Create From File option and click Browse to locate and choose the document or spreadsheet that contains the table. By default, the presentation software will insert the table.
- When you click OK, the entire document or spreadsheet is imported to your slide. Double-click the inserted text to remove extra text if the document contains more than the table.
- If you check the Link checkbox while inserting. On doing so, after you update the table in the document or spreadsheet, then right click on the imported table in the presentation software, and select the option Update Link, the embedded table gets updated automatically.
- Drag and drop the table on the slide to position it.


0 comments:
Post a Comment